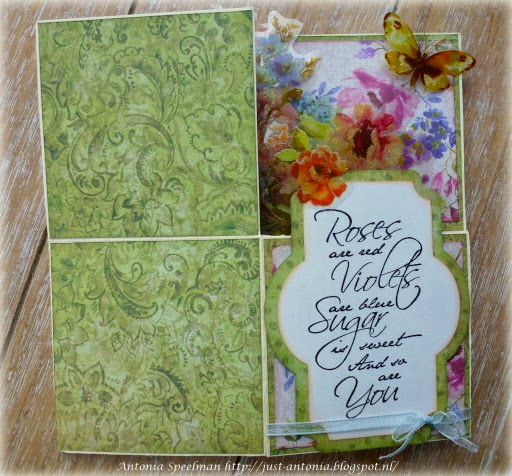
Met de ontvangen materialen en sketch heb ik voor http://scrapplezier.blogspot.nl/ bovenstaande kaart ontworpen.
Zoals beloofd wil ik aandacht besteden aan techniek. Hoewel plezier hebben het allerbelangrijkste is bij het maken van kaarten, kan een beetje kennis van de techniek dat plezier alleen maar verhogen!
~
Ik heb alle randen van de onderdelen van de kaart bewerkt met Distress Ink. Door dit te doen krijgt je kaart meer diepte en een afgewerkte uitstraling.
~
Als je designpapier niet al te dik is, kun je er een laagje dun papier achter plakken.
Hierdoor lijkt je kaart ook iets voller en rijker.
~
Door bepaalde kleuren of designs op je kaart te herhalen krijg je een soort ritme en creëer je rust.
Het mosgroene ruitjespapier heb ik op drie plaatsen laten terug komen, zo ook het lichtgroene ruitjespapier.
~
De afgeronde hoeken zijn gemaakt met een een die. Ik heb op het eerste hoekje met potlood aangegeven waar ik het wil afronden en heb de die daarlangs gelegd. Het afgetekende hoekje heb ik afgeknipt en gebruikt als mal voor de andere hoekjes. De die snijd namelijk iets meer weg, door steeds het met potlood afgetekende hoekje te gebruiken worden de afrondingen even groot.
~
Hier kun je een uitleg vinden over hoe je een strik maakt:
http://vanlaardesigns.blogspot.nl/2011/07/paper-bow-tutorial.html
Veel plezier!
I've designed the card above for http://scrapplezier.blogspot.nl/ with te materials and the scetch I've recieved.
As promised I want to pay attention to the technique. Although the fun is most important when you make a card, if you know something more of the technique, it can only enhance the pleasure.
~
I have all the edges of the parts of the card distressed with ink. By doing this your card will have a more finished appearance.
~
If you design paper is a bit thin, can you paste a layer of thin paper behind it.
This will make your card fuller and richer.
~
By repeating certain colors or designs on your card, you get a kind of rhythm and create rest.
I let the moss green and the light green paper return three times on the card.
~
The rounded cornes are made with a die. I marked the first corner with a pencil. I saved the marked corner after I've rounded the corner and used it as a guide for the other corners. When you lay the die next to the marked corner, the die will cut out a little bit more then the pencil mark.
~
You can find a tutorial about the bow here:
http://vanlaardesigns.blogspot.nl/2011/07/paper-bow-tutorial.html
Have fun!


